Pular para o conteúdo principal

Quarkus Langchain4J support to MCP Servers is AMAZING

 We talked about Tools and then MCP. In this post let's talk how to use Quarkus and lanchaing4j to connect your intelligent application to MCP servers!

Requirements


  • Java Open JDK  (24 is preferred)
  • Maven
  • Ollama with at least one LLM model that you can locally. Notice that you could use other providers such as ramalama and vllm, but you will need to use the correct dependencies for OpenAI API.
  • jbang, npx or other tool required top run the MCP server


The LLM client application


Our application simple needs the dependencies quarkus-langchain4j-mcp, quarkus-langchain4j-ollama and quarkus-rest. You can generate your application online using Code Quarkus. About the code, you only need one single interface:

import dev.langchain4j.service.SystemMessage;
import io.quarkiverse.langchain4j.RegisterAiService;

@RegisterAiService
public interface AIService {

@SystemMessage("You are a nice and helpful assistant.")
String input(String input);

}


Once this code is added, The next step is to configure the application. Open the file application.properties and configure at least the ollama model that you will use. Other configuration are also possible as described in Quarkus langchain4j documentation.

quarkus.langchain4j.ollama.chat-model.model-id=qwen2.5:latest


That's all to have a working  assistant! You can run the app using your IDE (for example, using Quarkus VS Code extension) or go to a terminal, navigate to the project root and run mvn clean compile quarkus:dev


Once the server is started, you can navigate to DEVUI, select the langchain4j card and chat with your LLM:

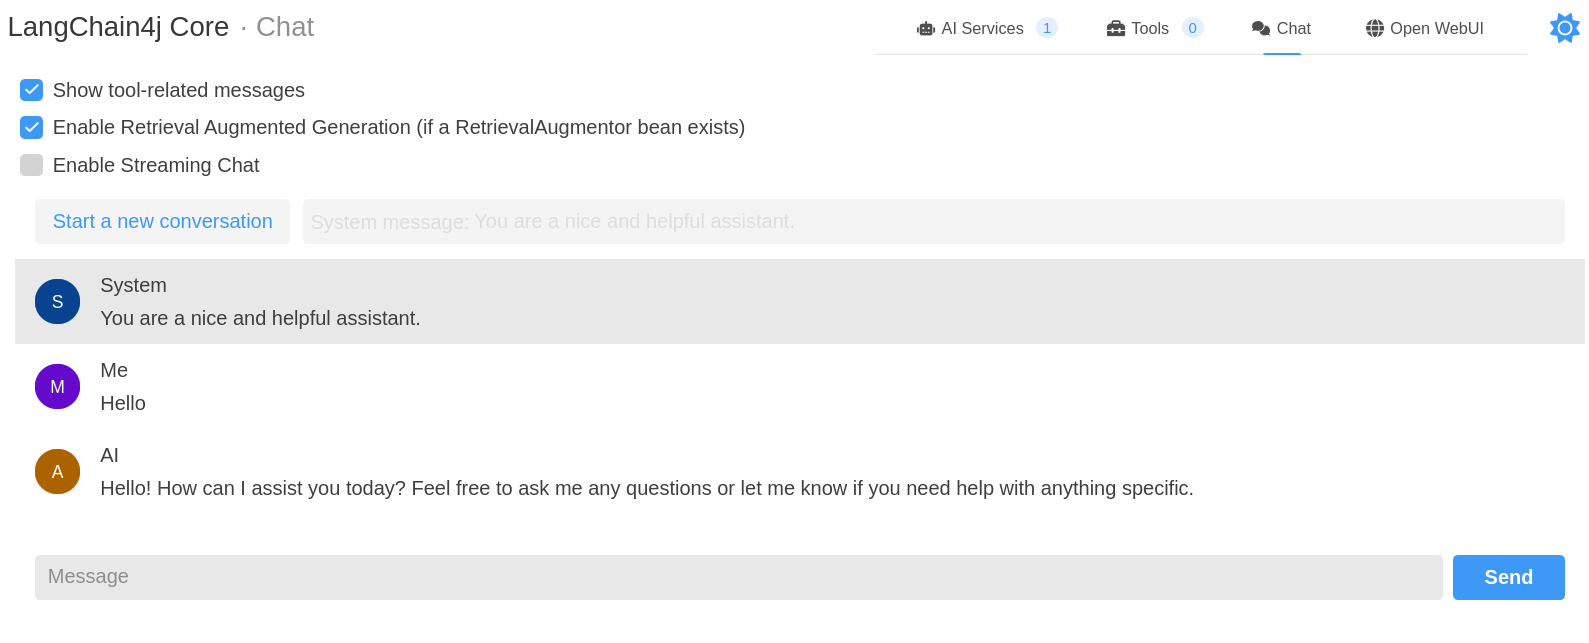
Quarkus DEV UI


Chat with our assistant


From now you could inject your service and integrate with other stuff, but lets stick with the dev UI for now.


Registering MCP Server


A MCP Server can bring many functionalities to your LLM and there are thousand MCP Servers ready for use! In our example let's use the JDBC MCP Server. What you need to do is simply configure this provider. See how it looks like in our application.properties :


quarkus.langchain4j.mcp.jdbc.transport-type=stdio
quarkus.langchain4j.mcp.jdbc.command=jbang,jdbc@quarkiverse/quarkus-mcp-servers


In this configuration we simply declare the transport type (how our MCP client will comunicate with the MCP Server) and the parameters to start the MCP server! We can also use a JDBC connection URL, if you don't provide it, then the MCP Server will use an in memory H2 database. For example, if we want to use sqlite you simply have to use the following configuration:


jbang,jdbc@quarkiverse/quarkus-mcp-servers,jdbc:sqlite:./database.db


Now if you restart your application and go back to the DEV UI you will see that your client can handle a SQL Database in plain English!


Asking the LLM to create a table in plain English
We can see that our table was created!
It can even describe our table
You can quickly insert mock data as well
On SQL Viewer App you can upload the generated sqlite database and see if the data is correct!


MCP advantages

There's a good discussion about what MCP brings to the table. If you are on future, probably you know if MCP is a standard for plugging Tools into LLM or not. In our example the advantage is clear: we gave superpowers to our application by simply modifying a configuration!

My wish list for Quarkus Langchain4j MCP extension is only a good web UI that shows the registered MCP Servers and possibly even allow us to interact with it!


Conclusion

MCP and LLMs, Agents and event the new A2A protocol are another world, but it is still programming , exciting times we live on! I was very surprise how easy it was to create this post and test MCP Servers using Quarkus, the most powerful Java framework.


See the code on my Github


Comentários

Postagens mais visitadas deste blog

Creating custom Work Item Handler in BPM Suite/jBPM 6

Hi all! In this post I am going to share my experience creating a work item handler for BPM Suite 6.0.3 (which is very similar to jbpm as explained in a previous post ). The Hello World Work Item Handler Let's create a really simple WorkItemHandler just to print "Hello World" in the console. Of course you can implement more feature and make it receive parameters, access database, web services, etc. But in this post we will keep it simple. Really simple. First thing to do is to create a maven project for my WorkItemHandler. Here's the pom.xml of my Maven project: Notice that we are importing jbpm dependency so we can find the java interface that is used to create work item handlers. Now we can start coding. Let's create a class name HelloWorkItemHandler in package org.jugvale.jbpm, here is the simple code: Now we can build our project and go to BPM Suite to configure it so we can use this workitem. Registering the WorkItemHandler UPDATE...

Using the REST Task from jBPM 6

In this post I am going to share my experience using the BPM Suite 6 REST Task. BPM Suite  X jBPM jBPM is a JBoss community project to offer an open source and efficient BPM Suite and BPM Suite is a product created by Red Hat based on jBPM. In this post I will be using BPM Suite because I have it installed already, but what I am going to described should work for jBPM as well.   REST Task  The REST Task is used to invoke a REST resource (or perform an HTTP Request) from your Business Process. You can set the URL, HTTP Method, timeout and credentials from the Process Modeller interface and when the process gets into that task, it will generate a HTTP Request and return the response as String. It is available on the left side pallet under the "Service Tasks" tab: The Target REST Web Service The service we are going to access from our process is a really simple one, that's why it is called simple-hello-rs and it is based on JBoss helloworld-rs qu...

Simplest JavaFX ComboBox autocomplete

Based on this Brazilian community post , I've created a sample Combobox auto complete. What it basically does is: When user type with the combobox selected, it will work on a temporary string to store the typed text; Each key typed leads to the combobox to be showed and updated If backspace is type, we update the filter Each key typed shows the combo box items, when the combobox is hidden, the filter is cleaned and the tooltip is hidden:   The class code and a sample application is below. I also added the source to my personal github , sent me PR to improve it and there are a lot of things to improve, like space and accents support.