In my last post I briefly showed a project that was supposed to be a small project to test Afterburner.fx. It is basically a CRUD application, but it uses REST to access a JEE application installed in JBoss AS 7 (renamed as Wildfly).
In this post we will show the server side and how JEE 6 makes easier creating robust enterprise applications. It's required at least basic knowledge in JEE.

Understood this part, we will now talk about code!
Notice we don't have anything special on this class besides some annotations:
To use JPA we need to basically a JEE compliant application server then you can start deploying applications to it that uses JPA. JBoss AS 7 uses Hibernate as its JPA implementation.
In our application we can see JPA being used in the following parts:
Points to notice on this class are that it is an EJB, notice the @Stateless annotation. You might know that EJB is much more than this simple annotation, I won't go in details on this post, but the reason why this is an EJB is that now my database transactions are controlled by the container, which means less code!
Other things to notice is that the EntityManager object has an annotation on it and I never instantiate it!

With CDI you will be able to connect the things without having to worry about how to instantiate and manage the beans lifecyle. Again, CDI surely goes beyond this simple description, and you can read more about this here.
In our application we will be using CDI to inject the EntityManager for us with the annotation @Inject. You might be wondering how CDI knows how to instantiate it. We do this by creating a class that contains the necessary information so the container knows how to create the EntityManager instance. See:
Notice the annnotation @Produces. It tells that the instances will produced using this EntityManager as reference. At last, we create an empty file called beans.xml just to "activate" CDI.
Ok, our system is ready(ok, it's lacking tests...)! But how can the "outside world" access it? Well, in our case we created a REST interface.
In our case we just need one class to expose all our CRUD operations:
As you can see, it's basically one class that uses annotations to describe in what conditions that method will be invoked:
In this post we will show the server side and how JEE 6 makes easier creating robust enterprise applications. It's required at least basic knowledge in JEE.
Architecture
I won't go further on this subject since Hendrik Ebbers did a great job doing this in this post. The following image explains everything: JavaFX communication with the server through a REST interface and it will access the model data using a Business Layer. The difference is that we won't have a JSF layer at the moment and we will have a Service Layer , which is equivalent to the Business Layer.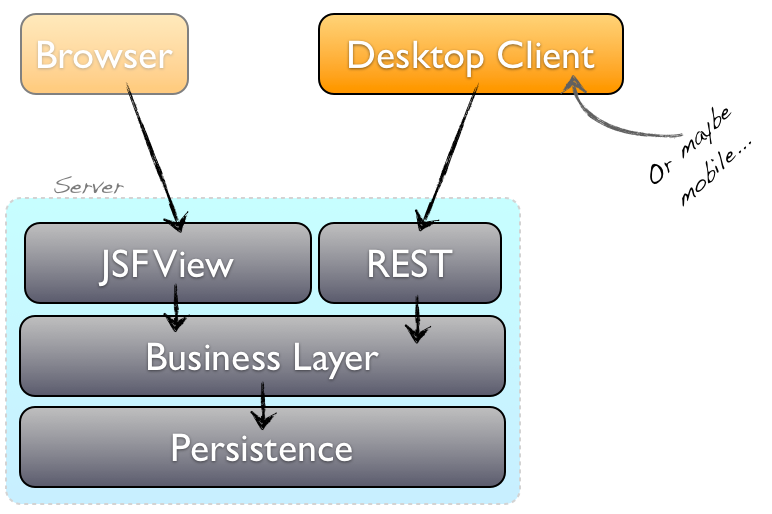
Understood this part, we will now talk about code!
The application model
Everything starts with a model that is the class that reflects the business of your application. In this case we only have a model class that just represents a Framework object.
import java.util.Date;
import javax.persistence.Entity;
import javax.persistence.GeneratedValue;
import javax.persistence.Id;
import javax.validation.constraints.NotNull;
import javax.xml.bind.annotation.XmlRootElement;

@XmlRootElement
@Entity
public class Framework {
    @Id
    @GeneratedValue
 private int id;
 private double currentVersion;
 private String description;
 private Date lastReleaseDate;
 @NotNull
 private String name;
 // yeah, not normalized.
 private String creator;
 private String homePage;
 private String platform;

//getters and setters...
}
Notice we don't have anything special on this class besides some annotations:
- @XmlRootElement: Will make it parseable by the JAX-RS implementation. It means that after adding it, this object will automagically be able to be marshalled/unmarshalled to JSON and XML;
- @Id, @GeneratedValue and @Entity: These are the JPA related annotations that helps this object to be persisted and recognized;
- @NotNull: It's a Bean Validation annotation, we aren't using it currently.
JPA and the service layer
JPA (Java Persistence API) is an API aimed to help us to persist the business information in a database, so you can access and modify it later. JPA make available some annotation to put meta information on an Java object to make possible to persist.To use JPA we need to basically a JEE compliant application server then you can start deploying applications to it that uses JPA. JBoss AS 7 uses Hibernate as its JPA implementation.
In our application we can see JPA being used in the following parts:
- As told, we use some JPA annotations in our model class, which are:
- @Id: informs the field that is the only identifier of the database row and a few more things
- @GeneratedValue: This means that this field will have its value generated. How? Don't matter, JPA will talk to the database to make it works. Anyway, you can learn more about this annotation here.
- @Entity: Just tell JPA that this is a class that represents a database entity.
- Then we had to configure JPA by modifying META-INF/persistence.xml. It allowed me to tell JPA the Datasource JNDI name so JPA can lookup it and send commands to the database and also modify some hibernate properties in order to drop the database everytime we deploy the application... See here our persistence.xml
- Now we simple have to manipulate our object to create, remove, update and delete it as we want by using the EntityManager class. The class that uses it is called FrameworkService:
import java.util.List;
import javax.ejb.Stateless;
import javax.inject.Inject;
import javax.persistence.EntityManager;
import org.jugvale.crudframeworks.model.Framework;

public class FrameworkService {

        @Inject
        EntityManager em;

        public void save(Framework javaFramework) {
                em.persist(javaFramework);
        }

        public void update(Framework javaFramework) {
                em.merge(javaFramework);
        }

        public void remove(int id) {
                Framework f = retrieve(id);
                em.remove(f);
        }

        public Framework retrieve(int id) {
                return em.find(Framework.class, id);
        }

        @SuppressWarnings("unchecked")
        public List retrieveAll() {
                return em.createQuery("SELECT f FROM Framework f").getResultList();
        }
}
Points to notice on this class are that it is an EJB, notice the @Stateless annotation. You might know that EJB is much more than this simple annotation, I won't go in details on this post, but the reason why this is an EJB is that now my database transactions are controlled by the container, which means less code!
Other things to notice is that the EntityManager object has an annotation on it and I never instantiate it!

Tying the layers with CDI
CDI, Context and Dependency Inject is another specification part of the JEE world and obviously you can deploy CDI applications to a JEE complaint application server.With CDI you will be able to connect the things without having to worry about how to instantiate and manage the beans lifecyle. Again, CDI surely goes beyond this simple description, and you can read more about this here.
In our application we will be using CDI to inject the EntityManager for us with the annotation @Inject. You might be wondering how CDI knows how to instantiate it. We do this by creating a class that contains the necessary information so the container knows how to create the EntityManager instance. See:
import javax.enterprise.inject.Produces;
import javax.persistence.EntityManager;
import javax.persistence.PersistenceContext;

// source: https://github.com/jboss-jdf/jboss-as-quickstart/blob/jdf-2.1.1.Final/kitchensink/src/main/java/org/jboss/as/quickstarts/kitchensink/util/Resources.java
public class Resources {
 @SuppressWarnings("unused")
 @Produces
 @PersistenceContext(unitName="crud-frameworks-persistence-unit")
 private EntityManager em;
}
Notice the annnotation @Produces. It tells that the instances will produced using this EntityManager as reference. At last, we create an empty file called beans.xml just to "activate" CDI.
Ok, our system is ready(ok, it's lacking tests...)! But how can the "outside world" access it? Well, in our case we created a REST interface.
Exposing the application using a REST interface
Another specification part of JEE is JAX-RS. Specified under JSR 220, JAX-RS 1.1 makes easy to expose a bean as a REST WEB Service and allow it to be invoked by a remote client over HTTP.In our case we just need one class to expose all our CRUD operations:
import java.util.List;
import javax.ejb.EJB;
import javax.ws.rs.Consumes;
import javax.ws.rs.DELETE;
import javax.ws.rs.GET;
import javax.ws.rs.POST;
import javax.ws.rs.PUT;
import javax.ws.rs.Path;
import javax.ws.rs.PathParam;
import javax.ws.rs.Produces;
import javax.ws.rs.WebApplicationException;
import javax.ws.rs.core.MediaType;
import javax.ws.rs.core.Response;
import javax.ws.rs.core.Response.Status;
import javax.ws.rs.core.UriBuilder;

import org.jugvale.crudframeworks.model.Framework;
import org.jugvale.crudframeworks.service.FrameworkService;

/**
 * REST Interface
 *
 * @author william
 *
 */
@Path(FrameworkResource.BASE_PATH)
@Produces({ MediaType.APPLICATION_JSON, MediaType.APPLICATION_XML })
public class FrameworkResource {

 static final String BASE_PATH = "frameworks";

 @EJB
 FrameworkService service;

 @POST
 @Consumes({ MediaType.APPLICATION_JSON, MediaType.APPLICATION_XML })
 public Response save(Framework framework) {
  if (framework.getId() != 0)
   return Response
     .status(Status.BAD_REQUEST)
     .entity("Framework with id \""
       + framework.getId()
       + "\". ThIs method isn't used to update resource, use PUT for this.")
     .build();
  service.save(framework);

  // Will also add a header to inform the ID of the newly created
  return Response.created(
    UriBuilder.fromPath(BASE_PATH)
      .path(String.valueOf(framework.getId())).build())
    .build();
 }

 @PUT
 @Path("{id}")
 @Consumes({ MediaType.APPLICATION_JSON, MediaType.APPLICATION_XML })
 public Response update(@PathParam("id") int id, Framework framework) {
  // Weird, probably trying to update a framework with the content of
  // other framework..
  if (id != framework.getId()) {
   return Response
     .status(Status.CONFLICT)
     .entity("Trying to update framework with id \"" + id
       + "\", but with body of framework with id \""
       + framework.getId()
       + "\". Check your request body and request URI")
     .build();
  }

  checkIfFrameworkExists(id);
  service.update(framework);
  return Response.noContent().build();
 }

 @DELETE
 @Path("{id}")
 public Response remove(@PathParam("id") int id) {
  checkIfFrameworkExists(id);
  service.remove(id);
  return Response.noContent().build();
 }

 @GET
 @Path("{id}")
 public Framework retrieve(@PathParam("id") int id) {
  checkIfFrameworkExists(id);
  return service.retrieve(id);
 }

 @GET
 public List retrieveAll() {
  return service.retrieveAll();
 }

 private void checkIfFrameworkExists(int id) {
  if (service.retrieve(id) == null)
   throw new WebApplicationException(Response.status(Status.NOT_FOUND)
     .entity("Framework with ID \"" + id + "\" not found.")
     .build());

 }
}
As you can see, it's basically one class that uses annotations to describe in what conditions that method will be invoked:
- The @Path indicates URI of the method or a base URI for all the methods when it is used on the class;
- @GET, @POST, @PUT and @DELETE are the annotations that describe the HTTP method that corresponds to the Java method that contains this annotation;
- @PathParam is to map a path parameters(that are in the URI) to a method parameter;
- @Produces and @Consumes are used to tell which data format are returned/accepted by this method. Notice that when it receives an object, it has the @Consumes annotation, when it returns something we have the @Produces. When we use two formats as we did in our class(XML and JSON), the format to be returned by the server is determined by the HTTP header Accepts and the format of the content body is informed by the client using the header Content-Type;
- We also use a few JAX-RS classes to throw exceptions that uses the class WebApplicationException and will result in meaningful HTTP codes(notice if you throw an usual Java exception the server will respond with http code 500 no matter what exception was thrown) and the class Response to build our HTTP Response;
import javax.ws.rs.ApplicationPath;
import javax.ws.rs.core.Application;

@ApplicationPath("rs")
public class JaxRsActivator extends Application{
}
Deploying to JBoss AS 7
In the server module, we have to create a datasource file. It's specific to JBoss, not JEE and the object of this file is tell information about a database. In our case, the datasource uses the embedded JBoss database as the storage of our application.
You can check this configuration in our datasource XML file. Notice we reference it in persistence.xml
java:jboss/datasources/CRUDFrameworksDS
The ds file is placed in META-INF directory of the core project, so it will be installed to JBoss when we deploy our application.

The project is structured using Maven. I took the pom.xml structured as it is used in JBoss quickstarts. If you checkout our project source, and if you have maven correctly installed and configured, you should be able to build it by simply using the command mvn clean package in the crud-frameworks-server module.
Notice we have a web module for the REST layer and another one for the business layer(core). They all will result in an EAR in directory crud-frameworks-server/crud-frameworks-ear/target and it can be downloaded to an Application Server.
You can check this configuration in our datasource XML file. Notice we reference it in persistence.xml
The ds file is placed in META-INF directory of the core project, so it will be installed to JBoss when we deploy our application.
Project structure

The project is structured using Maven. I took the pom.xml structured as it is used in JBoss quickstarts. If you checkout our project source, and if you have maven correctly installed and configured, you should be able to build it by simply using the command mvn clean package in the crud-frameworks-server module.
Notice we have a web module for the REST layer and another one for the business layer(core). They all will result in an EAR in directory crud-frameworks-server/crud-frameworks-ear/target and it can be downloaded to an Application Server.
Conclusion
It's done! We described briefly the server side of our CRUD application. Next post we will talk about the client part and how we used FXML and JavaFX to build the client and make requests to the server. See ya!
Este comentário foi removido por um administrador do blog.
ResponderExcluirHi Adrian, I excluded your comment by mistake, sorry.
ExcluirThe correct should be @XmlRootElement and I use Stateless to make the bean an EJB and inject it in the REST Facade. Also, as being an EJB, the transaction are now managed by the container, so I save some code and can configure transaction directly in the EJB container which my application is running.