IoT, the Internet of Things, is about putting things on the internet, making the world smarter and connected. Is one of the last steps until we reach ubiquon, Ubiquitous computing. I remember when I heard about it in the college... Now it is happening.
The problem I see that if I want to create applications using things I will have to get in the middle of the chaos that is happening right now. Of course, in the software side there're great initiatives, such as RHIOT and MQTT, but in the hardware side, well, I bought a lot of sensors, devices and I always have to spend some time with it to actually start creating applications.. Then I found the IoT Surfboard project.
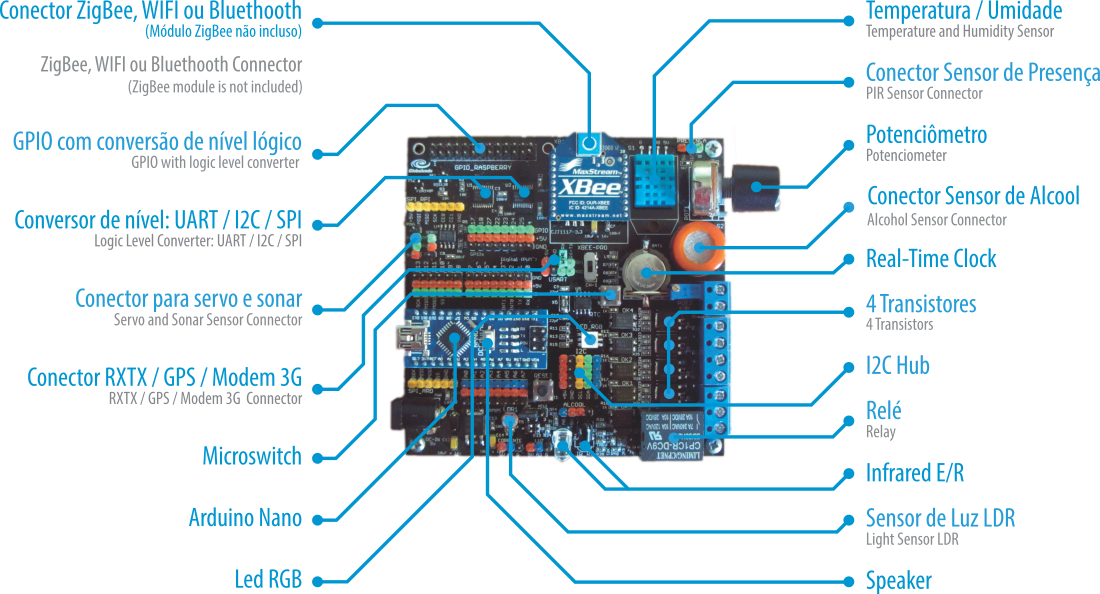
The project leader is the java champion Vinicius Senger and it is aimed to allow from beginners to experts to create IoT applications. It is a board that is based on Arduino and comes with components and sensors already integrated:
The good thing is that its API is powerful and allow non programmers to read the sensors only sending simple commands to the serial port such as temp(returns the current temperature), light(returns the light intensity based on a LSD sensor) and also switch relays using, for example, relay?1, relay?0 and much more!
For advanced users, the board can have its featured extended by, for example adding a Zigbee module, integrating it with a RaspberryPi or integrating it with known technologies, such as MQTT. There are hundreds of possibilities!
The problem I see that if I want to create applications using things I will have to get in the middle of the chaos that is happening right now. Of course, in the software side there're great initiatives, such as RHIOT and MQTT, but in the hardware side, well, I bought a lot of sensors, devices and I always have to spend some time with it to actually start creating applications.. Then I found the IoT Surfboard project.
About IoTSurfboard
The project leader is the java champion Vinicius Senger and it is aimed to allow from beginners to experts to create IoT applications. It is a board that is based on Arduino and comes with components and sensors already integrated:
 |
| IoTSurfboard components |
The good thing is that its API is powerful and allow non programmers to read the sensors only sending simple commands to the serial port such as temp(returns the current temperature), light(returns the light intensity based on a LSD sensor) and also switch relays using, for example, relay?1, relay?0 and much more!
For advanced users, the board can have its featured extended by, for example adding a Zigbee module, integrating it with a RaspberryPi or integrating it with known technologies, such as MQTT. There are hundreds of possibilities!
How it works?
These are the exact steps I followed on my Linux machine:
- After unboxing the board, I connected it to some of my available USB ports. It will blink some leds, like it is booting, so I waited a few minutes;
 |
| An adult with his toy |
- Then I opened Arduino IDE and selected the port where the surfboard is connected(menu tools -> port);
- Next I selected the serial monitor and typed speaker?1 and then I heard beeeeeeppppp
and my wife got mad because our baby was sleeping, after I typed speaker?0 and the beeeeeeppppp stopped.
And that's our hello world! As you can see, you can make the basic usage of surfboard by simply sending commands and reading the response in the serial port where the surfboard is connected. I did not install anything, I just connected the device and started sending commands.
The surfboard, of course, has a lot of other features. Here's a self explanatory summary of basic commands to read sensors and control some I/O:
Sensors:
temp humidity light pot clock alcohol*
Leds and speaker:
red?01 green?0255 blue?0255 speaker?01
I/O
relay?01 transistor?01
* The alcohol sensor must be connected manually
There are also a few advanced commands:
?: Return all the board features in JSON format;
??: All the details plus ID, serial and key of the board;
sensors: all the sensors state in JSON format.
Conclusion
The IotSurfboard is a great starting point for who is looking to start creating IoT applications. Next post regarding IotSurfboard we will talk about its Java API!
Comentários
Postar um comentário